| Sage Accpac ERP |
|
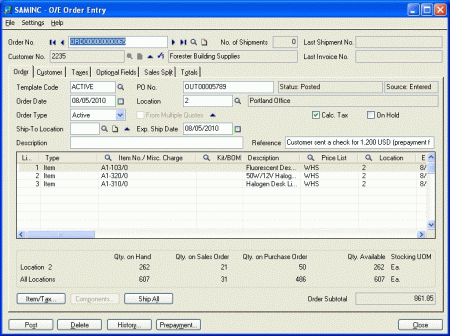
Q – How is the Quantity Available calculated in Order Entry? In the O/E Order Entry screen in the summary of item quantities at the bottom of the screen, it seems that the Quantity Available does not reflect the Quantity on Sales Order or the Quantity on Purchase Order.
A – Prior to version 5.2, the Quantity Available = Quantity on hand – Quantity on Sales Order + Quantity on Purchase Order. Q – I’m trying to import budget information into the General Ledger using an Excel format. Why is the Budget Maintenance Information not updating with the data in the Import File? A – When using the Excel file format make sure the format for all values in the ACCTID column are defined as a label. In Excel, the easiest way to define a value as a label is to put an apostrophe at the beginning of the value. Q – Can I search for Communications?
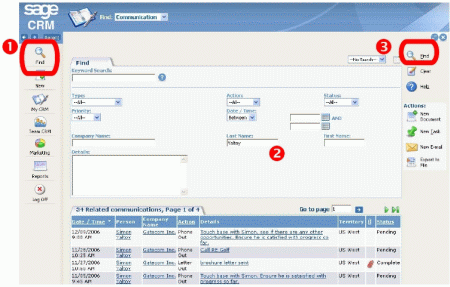
A – Yes. In SageCRM v6.0 you can go directly to a communications search screen from the Find button. From here, you can search for all communications, or you can select filter criteria to define your search. To search for communications:
|
| Sage Accpac CRM |
|
Q – Is there a way to add a CRMFile Column to the Sent Items Box to indicate an e-mail has been filed? In Outlook’s Inbox, a check mark appears under the CRMFile column after filing an e-mail to indicate an e-mail has been filed. E-mails in the Sent Items folder can also be filed; however, the CRMFile column is not available to indicate an e-mail has already been filed. A – To add the CRMFile column in the Sent Items folder, perform the following steps:
The CRMFile column should now appear in the Sent Items folder to indicate which sent e-mails have been filed into SageCRM.
|
| Sage Pro ERP |
|
Q: In the Purchase Orders Line Item Detail Screen: Where do the amounts for “On Hand”, “Allocated”, and “Projected” come from? A: When entering a line item for a purchase order, the fields “On Hand”, “Allocated”, and “Projected” are filled with numbers that reflect what is on hand, allocated, and projected for the item being entered. this is how the program is designed. The information in these fields is being supplied from ICILOC.lonhand, ICILOC.lsoaloc, and a calculation of ICILOC.lonhand + ICILOC.lonordr – ICILOC.lsoaloc. lonhand + lonordr – lsoaloc = “Projected” If there seem to be problems with the quantities in these fields for the item, try the following troubleshooting steps to track down the discrepancy for this item in the databases. Please try the following:
Q: How are serialized parts handled in manufacturing? A: The best choice will depend on where serial numbers are required between creating finished goods and the original component parts. You should carefully consider the transaction and workflow requirements when choosing to serialize inventory in the Pro Series environment. Serialized items have substantially more data entry requirements when receiving and issuing inventory quantities. Serializing Only Finished Goods In this type of environment, it is important to configure Production Entry (PE) and Work Orders (WO) to not allow serialized components. Select Don’t Allow Serialized Components in the PE and WO setup screens. This will allow the manufacturing modules to:
Serializing Only Component Parts Assign serial numbers to all components prior completing work orders in this environment. Partially completed work orders are not supported since a partial quantity of the serialized item cannot be issued. Serializing Both Finished Goods and Component Parts This type of environment requires the greatest amount of data entry but provides a complete audit trial including which serialized components went into each serialized finished good. The manufacturing transaction system requires that the finished quantity be one on each work order in order to preserve the relationship between the serialized components required to manufacture the finished good and the serial number of the finished good itself. Depending on the number of serialized finished goods manufactured on a daily basis, this environment may create many work orders. Important: Q: Why does the Currency ID field does not appear in Order Entry? A: This situation occurs if OE has not been linked to AR. This can be verified from the Change Order Entry System Information screen:
The Currency ID field should now appear in OE as well as in AR. |
| Sage MAS 90 and 200 |
|
Q – How do you reverse a previously posted Accounts Payable check? A –
Q – What is the Extended Stub Report option in the A/P module, and how does it work? A – By definition, the Extended Stub report is a report that shows the invoice detail for the check being paid. The report can be printed for all checks or only for checks with more invoice detail than can fit on one check stub. If the Extended Stub report needs to print, the Extended Stub Report printing screen will appear just before the Check Register printing screen. You must print the Extended Stub Report to be able to update the Check Register. |
| Back to Top^ |
Search The Site
RSS & Newsletter Subscription
Axis Videos
-
Recent Posts
Categories
Blog Archives


 Download our corporate brochure for more facts about us, our
clients and our solutions.
 Driving Revenue Growth 1
 Satisfying Customers 1