Frequently Asked Questions

Sage
Accpac ERP

Q – Can you please explain what the provisional posting function does?

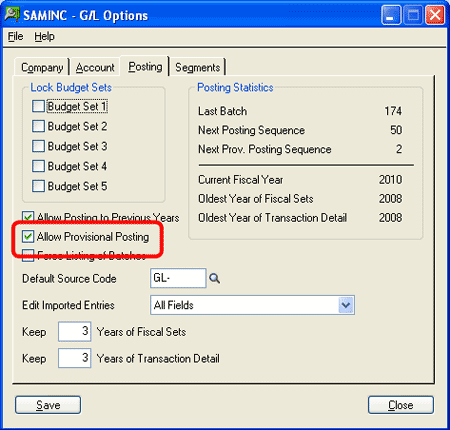
A – The “Allow Provisional Posting” setting is selected in the General Ledger Setup Options window on the Posting tab.

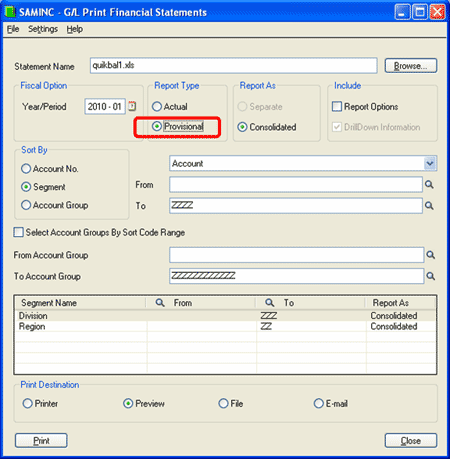
General Ledger allows you to temporarily post batches of transactions to accounts so you can test their affects. You can include provisionally posted amounts in financial statements.

You can edit provisionally posted batches until you post them permanently (or discard them). General Ledger assigns a posting sequence number to each batch of transactions you post provisionally.  This number is listed on the Provisional Posting Journal. General Ledger automatically creates and maintains provisional fiscal sets for each account to which a provisional amount has been posted. The set is deleted when the provisional data is deleted or posted permanently.

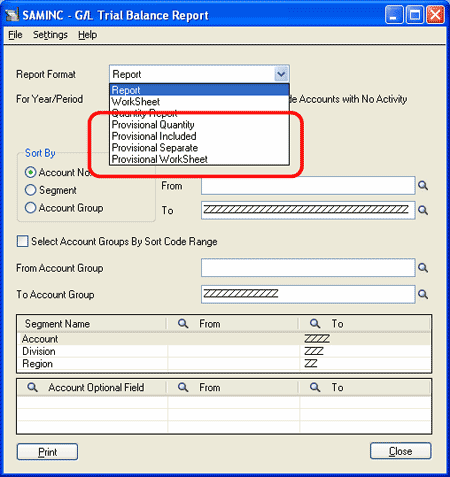
In addition to the Financial Reports, you can include Provisional Posted amounts in the Trial Balance report:

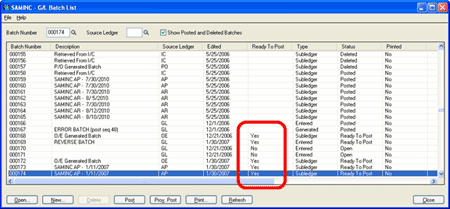
If you want to provisionally post multiple batches at the same time, you must mark each batch as “Ready to Post” in the G/L Batch List.

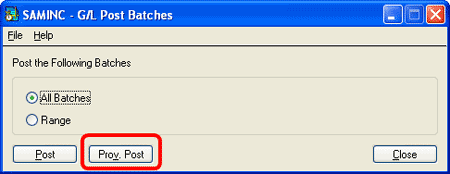
Next, open the Post Batches window and click on the Prov. Post button.

NOTE

Please keep in mind if you have provisional posted batches, and you post or provisional post other batches without resetting the Ready To Post flag to Yes, the formerly provisional posted batches will be reset to open.  In addition, marking a provisional posted batch Ready To Post will also reset the batch to an Open-Ready To Post status.

Q – What is the difference between the setting “Cost Inventory Items” During Post vs. Day End Processing?

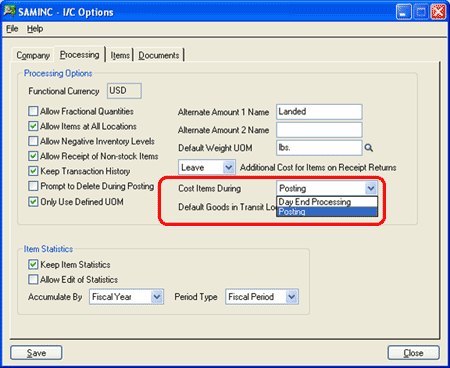
A – This inventory setting option lets you choose whether to cost items as soon as transactions are posted in Order Entry, Inventory Control, and Purchase Orders or at chosen times when you run an Inventory Control Periodic Process called Day End Processing.

  • If you cost inventory items at posting, every shipment, receipt, and transfer will update item costs—although this also means that posting orders from Order Entry can take longer.  Depending on the transaction that is posted, other processes are completed in addition to updating the cost: General Ledger, Accounts Receivable, and/or Accounts Payable batches are created as well.
  • If you process a large number of transactions, you may choose to update costs at day end.  While inventory quantities are updated immediately in Inventory Control regardless of the selection chosen, costs, General Ledger, Accounts Receivable and Accounts Payable batches will not be created until the Day-End process has been run.  For example:
    • All Order Entry shipment entries and Purchase Order receipts entries posted through out the day will not appear in the General Ledger until the Day End process has been run.
    • All Order Entry Invoices will not appear in Accounts Receivable until the Day End process has been run.
    • All Purchase Order Invoices will not appear in Accounts Payable until the Day End process has been run

In order to change this setting:

  • Verify all users have all Order Entry, Inventory Control and Purchase Order windows closed for this company.
  • Open the Options window located under Inventory Control – I/C Setup.
  • On the Processing tab, click the drop-down arrow next to the Cost Items During and select either “Posting” or “Day End Processing”.
  • Click on Save and then on Close
Sage Accpac
CRM

Q – When clicking on the ‘Export To File’ Icon, nothing happens. The pop up window flashes and disappears. I am unable to export the list.  How can I fix this?

A – This behavior is due to Internet Security settings. Follow the below steps to resolve the issue.

  1. Right Click on the Internet Explorer Icon.
  2. Click on Properties.
  3. Click on Security Tab.
  4. Click on ‘Local Intranet’ or ‘Internet’ depending on the zone of CRM you use (Hosted or In house).
  5. Click on Custom Level Button.
  6. Enable the ‘Automatic Prompting for File Downloads’ and ‘File Download options under  Downloads Category.
  7. Click on OK.

Now you will be able to successfully launch the Export to File download pop up screen.

Q – Can you pass parameters to a Crystal Report from within CRM?

A – You can use the following method to get a "search criteria screen" when using Crystal Reports with CRM.
This process allows you to pick search criteria like you would when doing a standard CRM report but passes the "where" clause on to the Crystal report.

  1. Set up a standard Crystal report – following the steps in Chapter 38 in the Accpac CRM v5.8 System Administrator’s guide.
  2. Create a text file using the following naming convention:

      reportname.rpt.search 
For example: companysummaryreport.rpt.search
Where “companysummaryreport” = “reportname”

  1. The first line of this file should contain the view/table the report is based on.
  2. The subsequent lines should contain the names of the fields you want to search on:

For example:    vsummarycompany
                              comp_name
                              comp_createddate
Where vsummarycompany is the View and comp_name and comp_creditdate are the field names to be used to search on.

  1. Save this file in the same directory as the crystal report.

Now when you run the report you get a CRM screen allowing you to set your search criteria.

Sage Pro ERP

Q – How can I add a New Module or Option to Sage Pro ERP?

A – Follow the steps below to add a new module or option to an existing installation:

Important:
Before proceeding with the installation, verify that there is a full and verified backup of the installation. Additions to existing installations should be done by Sage Certified Consultants and Business Partners.

  1. Launch the installation routine from the CD or web download.
  2. Click Next in the Welcome screen.
  3. Click I Accept in the Software License Agreement screen.
  4. In the Choose Destination Location screen, select the folder which contains the existing Sage Pro installation.
  5. Click Next.
  6. Click Next in the Conversion Information screen.
  7. In the ACCPAC Product Registration screen, enter the Company and new Product and Add-on activation codes when prompted. The Product activation code should include all previous applications as well as the new additions. The Add-on activation code should include all previous options and any new additions – if applicable. Both codes are required even if only one has changed.
  8. Click Next.
  9. In the Setup Type screen, click Custom Install.
  10. Click Next.
  11. In the Select Components screen, deselect all modules and options that have already been installed.

    Important:
    If the new modules or options are not included in the selection list, the new activation codes may be incorrect and did not include them. Also when to installing on a SQL installation, Pro SQL Manager must be selected. Otherwise a message may appear stating that the system is trying to change the database and will not allow the installation to proceed. Please refer to Knowledgebase article 20515 for additional information.

  12. Select System Files.
  13. Select all new module and options that are being installed. If this is a Microsoft SQL Server (SQL) installation, select Pro SQL Manager.
  14. Click Next.
  15. Select the appropriate program folder and click Next.

The system will now complete this installation. Once completed, confirm that the new modules and options can be accessed from within Sage Pro. Also, all applicable service packs, patches, and hot fixes should be reapplied once the installation is complete. When System Files are reinstalled and new modules and options are added, they may overwrite certain files.

This process may also be used to change the licensed company name of an installation. In that case, only System Files need to be selected installation. As of Sage Pro 7.3 or later, this can be done without reinstallation of the product. Please refer to Knowledgebase article 21090 for additional information on this feature.

Q – How do I use the GLBLREC Tool with Sage Pro ERP 7.3B?

A – In some cases, General Ledger (GL) balances may become out of balance due to network failure, power outage or other interruptions. The GLBLREC program may be used to correct the balances in GL. For Sage Pro 7.3B and prior this is an external utility available to Sage Business Partners as part of the Developer Tool Kit. This article explains how to obtain and install this program in Sage Pro 7.3B.
As of Sage Pro 7.4, this program is now included with the program and does not need to be installed separately.
Follow the steps below to install the GLBLREC program:

Warning
Ensure that there is a full and verified backup of the installation and data before proceeding. Also verify that all users have logged out of the installation; run the clear flags utility in System Manager to ensure that all modules are clear and no files are locked. This program operates completely independent of Sage Pro and running this program while another user is logged in may cause severe problems. Once completed, verify that the data is clean, accurate and stable.

  1. Copy the GLBLREC.FXP into the same directory as SYSDATA. This is generally the root directory of the Sage Pro installation.
  2. Under the File menu, point to Open and click FoxPro Access.
  3. Type the following commands into the VFP command window:

    DO [pathname]\SQLTEST
    DO GLBLREC

    For example if this tool is installed at C:\PRO73\TOOLS, the commands would look as following:

    DO C:\PRO73\TOOLS\SQLTEST
    DO GLBLREC

Note: When running the GLBLREC tool there will be a prompt for the Company number. The value accepted will be case sensitive. Therefore if the company ID has alpha characters in the ID it should be entered in upper-case characters. Otherwise the “Company [Company ID] is not found.” message will appear.

It is essential to also run the SQLTEST.PRG for VFP in order to create common data objects that are required by the program.

Warning
The documentation that comes with the developer toolkit states to use the commands below to runs GLBLREC:

DO TOOLS\SQLTEST
DO GLBLREC

This is incorrect and must be revised. The commands described in this article should be used instead.

Back to Top^
This entry was posted in February 2007, Newsletter and tagged , , , , , , , , , , , , , , . Bookmark the permalink.

Leave a Reply