| Sage Accpac ERP |
||||||||||||||||||
|
Q – Is there a way to search for duplicate Social Security numbers in Payroll? A – Yes. In Sage Accpac ERP v5.4, you can search for duplicate numbers in the Find Duplicate SSN window. When setting up employees, you may have inadvertently assigned the same social security to more than one employee. This report will help you identify employees who have been assigned the same number. The Find Duplicate SSN icon can be found under the Payroll Periodic Processing folder:
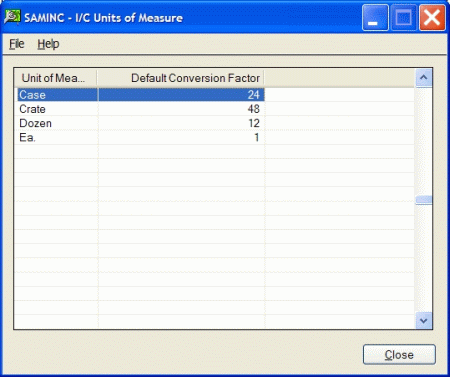
Q – We have run into issues with units of measure when setting up new items in the Inventory Control. Our users are using different codes for “EACH”. Is there a way to set up a standard list of units of measure and set Accpac so only these selections are available? A – Yes. In Sage Accpac ERP v5.4, you can now set up a centralized list of the units of measure that you use for your inventory items, along with conversion factors for converting between different units, so you can add them more easily to item records in the Inventory Control module. Units of measure are the quantities in which you buy, sell, price, and stock your goods. Units of measure can be numbers of items, dry measures, liquid measures, or weights. You can add all of your stocking units and multiples of stocking units to the Units of Measure window located under the Inventory Control Setup folder. To add new units of measure enter the following information (If units of measure have already been added to the Units of Measure form, you will have to press the Insert key to start a new line):
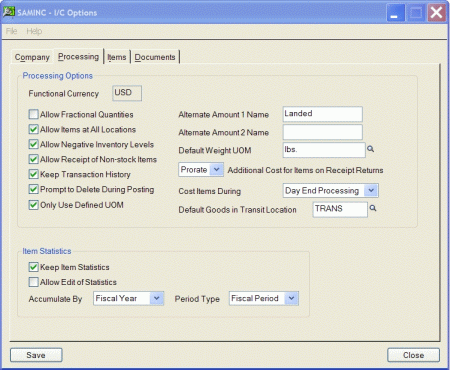
The next step is to set the “Only Use Defined UOM” setting:
Note: This option only affects new inventory items or new units of measure that you add to existing items. If you turn on this option, it will have no effect on existing items unless you add new units of measure to item records. |
||||||||||||||||||
| Sage Accpac CRM |
||||||||||||||||||
|
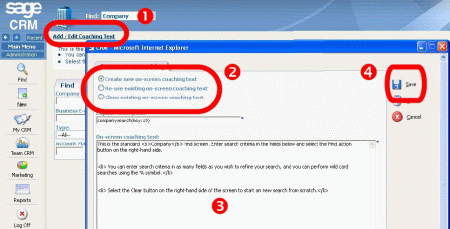
Q – Can I add new On-screen Coaching? A – Yes. As an administrator, you can add on-screen coaching for any screen in CRM. You can also edit existing on-screen coaching. To add on-screen coaching to a CRM screen:
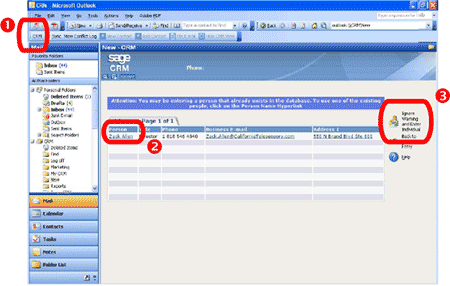
Q – Can I check if an Outlook contact already exists in CRM? A – Yes. When adding a contact from Outlook to CRM, users are presented with a list of possible matches for the new contact that are already in the CRM system. If the new contact already exists in CRM, the user can select this person from the available list. If no matching contact exists, the user can choose to ignore the list offered by CRM and continue adding their new contact. To check if an Outlook contact already exists in CRM:
|
||||||||||||||||||
| Sage Pro ERP |
||||||||||||||||||
|
Q – How can I have General Ledger account balances recalculated? A – Discrepancies in the GLBALS table can cause serious problems with critical financial reports such as the Income Statement and Balance Sheet. The Recalculate GL Account Balances function identifies and repairs out-of-balance batches and accounts. This feature replaces the FIXBALS and GLBLREC programs that were separately installed in previous versions. Follow the steps below to execute this function: Important
The recalculation routine performs a number of validations. Refer to the table below for a list of routines that will be fixed if Update Records was enabled in the option grid.
Q – How can I show components of a bill of material on a Sales Order? A – There are two methods by which components appear on a sales order (SO). Review the descriptions below to determine which option will best meet the needs of the organization. These should best tested in a test environment before implementing in a live company. Kit During SO Entry: This option treats the BOM as a kit item. All of the components will appear on the SO when this kit item is ordered. Example One "KIT1" is a kit item which has components "C1," "C2" and "C3." The SO will display "C1," "C2" and "C3" as line items on the order and "KIT1" will not appear. Note: SO Note Type: This option will send the BOM information to the SO as a customer note, internal memo or both. The notes, memo, or both settings should be used to allow components to appear on the sales order the Component list into. See below to review how each setting will appear:
Note: There are other settings for the SO Note Type field; this article only discusses three of them. For more information regarding this option, please refer to "Adding a New Bill of Materials" in the BOM documentation. Q – Is it possible to setup cost levels in Purchase Orders? A – In Sage Pro ERP 7.3, cost level functionality was introduced in Purchase Orders (PO). Here is explained how cost levels are setup and how to best use this feature. Cost levels may be used to specify costs for different quantity ranges of items that are purchased from vendors. This may be especially useful when dealing with vendors who offer differentiated pricing based on the quantity purchased. This feature also allows for setting effective date ranges that can be useful for limited-time or announced vendor price changes for the future. Cost levels are not required for items and vendors. If there is no cost level available for an item while entering a purchase order, the last cost recorded for the vendor will be used. This value is obtained from ICSUPL.Lastcst (as it works in Pro Series 7.2 and prior versions). However, if a cost level is defined for a particular item, the appropriate cost will be applied rather than the last cost. Please refer to Knowledgebase article 20480 for more information. Note: Cost levels are not maintained for product returns or for Job Cost.To setup cost levels, follow the steps below. For the purpose of this demonstration, data in Company 99 will be used.
Note: This should be tested in the sample company before implementing in a live system. Enter purchase orders for various quantities and notice how the price fluctuates based on the cost levels |
||||||||||||||||||
| Back to Top^ |
Search The Site
RSS & Newsletter Subscription
Axis Videos
-
Recent Posts
Categories
Blog Archives


 Download our corporate brochure for more facts about us, our
clients and our solutions.
 Driving Revenue Growth 1
 Satisfying Customers 1