Frequently Asked Questions

Sage
Accpac ERP

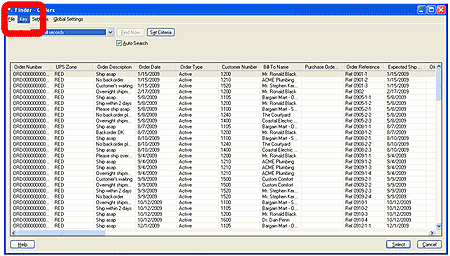
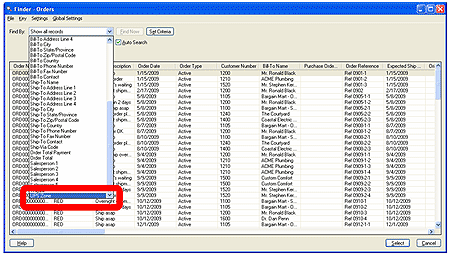
Q – I added the Order Entry Header “UPS Zone” optional field to my finder screen so the field column now displays, but the field is not available in the “Find By” drop down list.  Is there a way to change this?

A – Searching by Optional Field within the finder is a new feature that was introduced in Sage Accpac ERP v5.4.  Once you have added the optional field to the finder screen, go to the Key menu.

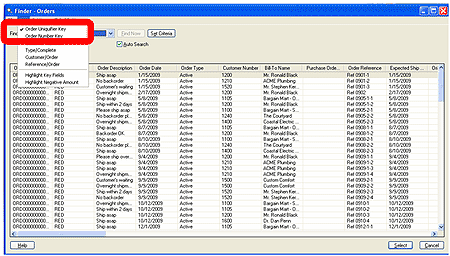
Click on the Order Uniquifier Key. 

The optional field will then be available in the "Find by" drop down list.

Q – Is there a way to setup Accpac so when I first open our Accpac company the Order Entry window will automatically open?

A – Yes.  Follow these steps:

  1. Login to the Sage Accpac company where you want the window to openautomatically.
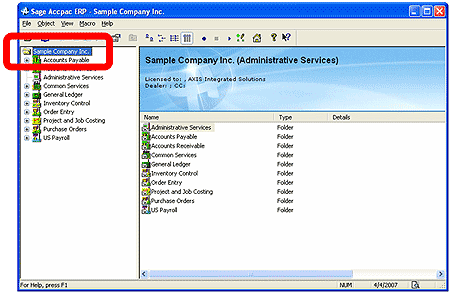
  2. On the Accpac Desktop, click on the company name in the left sidetree.
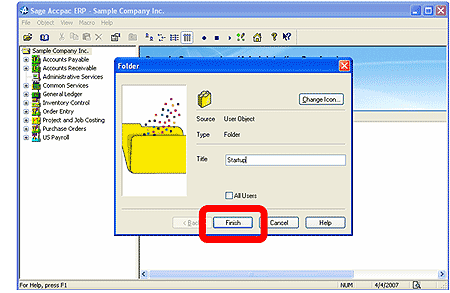
  3. On the right hand side, right click in the white space and select New – Folder
  4. Create a folder called "Startup”.  Click on Finish
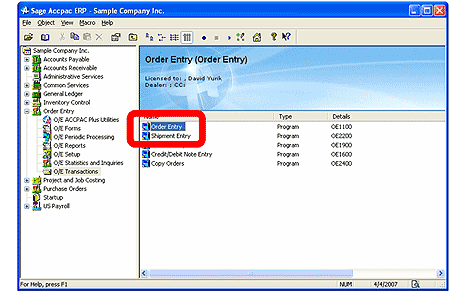
  5. Go to the Order Entry icon under Order Entry – O/E Transactions.
  6. Left-click and Hold the mouse button and drag the icon to the Startup folder and then release the button.
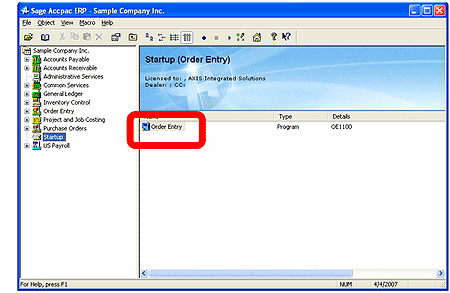
  7. Click on the Startup folder and the Order Entry icon is now also under the Startup folder.  The next time you sign into the company the Order Entry window will open automatically.

NOTE: Please make sure the icon is working before closing out of the company.  If there is a problem with the icon, Sage Accpac will give an error during login and kicks the user out of the program. The only way to get rid of the error is to rename the xxx_c.ism (where xxx is the company database id) file in the users folder to clear all the customized settings.

Sage Accpac
CRM

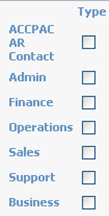
Q – Can you hide the person type option check boxes on Person Entry screen?

A – This process can be completed by a CRM Administrator by adding several lines of script to the Custom Content field under the Administration – Customization area.

Enter a Custom Script

  1. Log on to SageCRM as an administrator.
  2. On the left navigation menu, click Administration then Customization.
  3. On the Customization screen, click Person.
  4. Click the Screens tab.
  5. Click the Person Entry Screen link.
  6. In the Custom Content field, enter the following:
    <script>
    window.attachEvent("onload",MyFunction);
    function MyFunction()
    {
    document.EntryForm.PeLi_TypeARContact.style.visibility= ‘hidden’;
    document.EntryForm.PeLi_TypeAdmin.style.visibility= ‘hidden’;
    document.EntryForm.PeLi_TypeFinance.style.visibility= ‘hidden’;
    document.EntryForm.PeLi_TypeOperations.style.visibility= ‘hidden’;
    document.EntryForm.PeLi_TypeSales.style.visibility= ‘hidden’;
    document.EntryForm.PeLi_TypeSupport.style.visibility= ‘hidden’;
    }
    </script>
  7. Click Save.

Important
The line "document.EntryForm.PeLi_TypeARContact.style.visibility= ‘hidden’;" may be removed if SageCRM is not integrated with Sage Accpac ERP or Sage Pro.
Modify the Translation

  1. On the left navigation menu, right-click Customization then click Translations.
  2. Enter "Link_CompPers" in the Caption Family field.
  3. Click Find.
  4. Click the Admin link.
  5. Click Change.
  6. Enter "<&nbsp>" in the US Translation field.
  7. Click Save.
  8. Repeat the above steps for the other five results.

Refresh the Metadata

  1. On the left navigation menu, right-click System then click Metadata.
  2. Select the option "Refresh All."
  3. Click Execute Refresh.

Q – How do you create a report for Companies displaying all of the information that has been recorded in the Notes tab?

A – The current view in the system, vNotes, displays information stored in the Notes table. This view can be found in the Views tab under the secondary entity Notes. Since this view is not joined with a primary entity, such as Company, it cannot specifically display notes associated with a company record; it only displays all notes that have been entered.

To create a report that displays information stored in the Notes tab for a company, we need to create a view that joins the Company entity with the Notes entity.

Below is an example of how to create a report to display company specific notes.

  1. Log on to SageCRM as an administrator.
  2. Click Administration then Customization.
  3. In the Customization screen, click the Secondary Entities list and click Notes.
  4. Click the Views tab.
  5. Click New.
  6. In the View Name field, enter a name for the new view. For example, enter "vCompanyNotes."
  7. In the View Script field, replace SELECT * FROM NOTES with the following:
    SELECT Note_Note, Note_CreatedDate, Note_ForeignTableId, Comp_Name
    FROM Notes
    INNER JOIN Company ON Note_ForeignId = Comp_CompanyId
    WHERE Note_Deleted IS NULL AND Note_ForeignTableId = 5
  8. Select the option "Reports View."
  9. Click Save.

Generally, the view follows the following structure:
SELECT Note_Note, Note_CreatedDate, Note_ForeignTableId, [Primary Entity Field(s)]
FROM Notes
INNER JOIN [Primary Entity] ON Note_ForeignId = [Primary Key]
WHERE Note_Deleted IS NULL AND Note_ForeignTableId = [Primary Entity Table ID]
Primary Entity Field(s) are fields belonging to the primary entity. Below is a table of the primary entities, their keys, and table ID’s:

Primary  Entity

Primary Key

Primary Entity Table ID

 Company

comp_companyid

 5

 Person

pers_personid

 13

 Cases

case_caseid

 3

 Lead

lead_leadid

 59

 Opportunity

oppo_opportunityid

 10

Here is another example of a view that will display person specific notes:
SELECT Note_Note, Note_CreatedDate, Note_ForeignTableId,  Pers_firstname, Pers_lastname, comp_name
FROM Notes
INNER JOIN Person ON Note_ForeignId = Pers_PersonId
INNER JOIN Company ON Pers_Companyid = Comp_Companyid
WHERE Note_Deleted IS NULL AND Note_ForeignTableId =13

Sage Pro ERP

Q – What are the Drilldown Objects?

A – In Sage Pro 7.4, there are three default Drilldown Objects defined:

  • CUSTOMER
  • VENDOR
  • ITEM

These three objects are maintained in System Manager (SM) and can be defined to look up reports, open transactions, dataviews or maintenance screens to name a few. In certain transactions screens, a small blue triangle indicates that the value in that field is a Drilldown Object. On certain reports the customer, vendor or item IDs are in blue indicating that they are also Drilldown Objects. Furthermore, a Drilldown Object can also be accessed within dataviews, as long as the field contains a Drilldown Object value such as customer ID.

Important
The small blue triangle is called a Chisel.

Example One

  • In the Order Entry (OE) screen, type a value into a field that has a Chisel.
  • Right-click this field and point to Drill down to… A list appears displaying all of the information that can be viewed.

    Important
    The value needs to be entered into a Chisel first before the object can be accessed.

Example Two

  • Open Accounts Receivable.
  • Generate the Invoice Register Detail report.
  • Click Preview.
  • Click Drill down View.
  • Click any of the blue hyperlinks to launch the Customer Maintenance or Change or Void Invoices/Credit Memos screens.

Important
The Drill Down View option is available for most reports in Sage Pro, however, not all Drill Down Views will have the Drilldown Objects active for a report. Also, the reports should be run in Detail format in order to activate the Drilldown Objects.

To create a new Drilldown Object a new Driller ID needs to be defined in SM. Under the Maintain menu click on Drill Down, this will launch the Drill ID Maintenance screen. This maintenance screen is used to create and maintain Drilldown Objects and to define what each object can do.

Related Reading
For more information on the Drilldown Object feature please refer to the What’s New section of the Sage Pro Doc on Disk and in the SM documentation for Sage Pro 7.4, starting on page 401. The documentation provides an example of adding a new Driller ID.

Q –
Is there a way to reverse a customer overpayment instead of posting it as a credit against their account?

A –
The example below describes this process and uses Company 99 as the sample data.

Customer ACP1 was invoiced for $1,000 but accidentally paid $2,000 instead. Of this amount, $1,000 was applied to the invoice and the $1,000 overpayment was posted as a credit to the account. To return the extra $1,000, follow the steps below:

  1. Create a negative cash receipt for $1,000.
  2. Click Apply.
  3. Click No to decline including this refund in bank reconciliation. This will later take place in Accounts Payable (AP) and there is no need to repeat it here.
  4. Click Manual and apply the negative cash receipt against the outstanding balance.
  5. Open AP.
  6. Create a payable. This will debit the cash account and credit the AP Control account.
  7. Approve the payable and print the check.
  8. Reconcile the check in bank reconciliation.

The overpayment has now been reversed and customer ACP1 has received their money back in the form of a check.

Related Reading
For more information on reversing cash receipts and deposits, please refer to the Accounts Receivable documentation.

Q –
I want to keep the Recommended Purchase Order Screen from appearing when saving a Sales Order. How do I do that?

A –
The POGNRR02 privilege is designed for this specific situation. This privilege can be deactivated for Operator type users to prevent the Recommended Purchase Order screen from appearing in OE, even if stock falls below predefined levels.

This solution will not apply to Administrator type users, since privileges are not used for them. In this case, the user must be made an Operator type user and grant them all privileges except for POGNRR02. This will allow the user access to all previous functionality, except access to this screen in OE. One exception is that the user would not receive the option to override the login if they exit the program ungracefully. This is only available to Administrator type users.

Back to Top^
This entry was posted in April 2007, Newsletter and tagged , , , , , , , , , , , , , , . Bookmark the permalink.

Leave a Reply